Clicky

Hardie Backer Installation

Wednesday, February 29, 2012

We keep plugging away at our bathroom! We've finished all of the plumbing for the bath and are working on the walls now! I had to go under the house in order to finish the drain for the tub, and there isn't much room under there.


Chaucer wasn't quite sure what he thought of the weird noises coming from under his feet, but he felt reassured when he was able to see my face through the tub drain.


After finishing the plumbing it was on to installing a moisture barrier to go behind our wall where the tile will go. We used heavy duty flooring moisture barrier with a sticky seal at the bottom. It made it easy to connect the sheets together and we added some staples to hold it on the wall.


Most recently we have been installing Hardie Backer. Apparently named after James Hardie the inventor? It is basically waterproof concrete board that doesn't mold that goes under the tile. It is also very heavy and hard to cut. Each 3x5 sheet weighs over 30lbs and is a very awkward shape.


In order to cut this stuff you need to be Super Man. A lot of people use circular saws or grinders with carbide blades, but the problem is you have to throw the blades away afterwards. I went for the labor intensive "score BOTH sides using a utility knife, put the score on a 2x6 and kick it till it breaks." This works pretty well, but I had to use a hammer for the cuts that were 1".


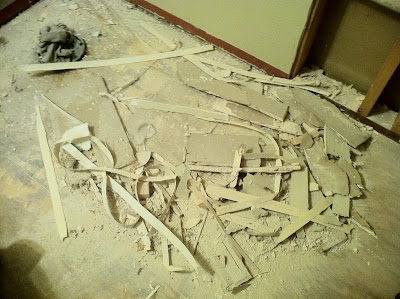
To create the holes for the shower faucet, handle and spout I used a masonry bit and a jigsaw. This is the aftermath of using the metal jigsaw blade to cut out an 8" in diameter circle. Pretty tough stuff.


 We are now finishing up the sheet rock and preparing to mud and paint the ceiling. We need the whole bathroom ready for tile by early next week. A contact from our church is going to install the tile, so we are excited to move towards finishing touches.

The sad news we discovered is that we did not get enough mortar under the back of the tub, and it is making a slight cracking noise when stepped on. We put the mortar under the tub to avoid this in the first place! That means this weekend I am planning a trip back under the house to cut a hole and add more mortar under the tub. Ill try to avoid the black widows and send you another update soon!


Read more...

Guest Bathroom Sneak Peak!

Saturday, February 25, 2012

For anyone preparing to undertake a remodel that ever struggles with indecisiveness or a lack of direction (me!), prepare to be overwhelmed by what seems like a million decisions all at once. I, for one, was overwhelmed and asked everyone for an opinion on vanities, tile colors, finishes, and so on. I also looked at tons of pictures on Pinterest and Houzz

The most helpful thing, though, was having an extremely limited budget. Can you imagine how many more options there would be with a $15,000 budget? Yuck. Anyway, without further ado, here is our Guest Bathroom Mood Board (not all items are exactly what we're using, but you get the idea).


1. Paint and accent colors. Green for the walls - Herbal Mist by Behr. I'm not set on that exact color, so I'll probably buy a sample first. The others are ideas for accent colors. Undecided.

2. Shower tile. Primarily 3"x 6" white subway tile with a row of accent tiles at eye level. We'll cut the sheets of glass tiles into 3 groups of 4 rows. Decided.

3. Obvious, isn't it? We couldn't salvage the old toilet cause it was off-white and not in great shape. Also, it wasn't the new elongated style. Added bonus, our toilet has "4 and half times more flushing power than the average adult needs!" Hey, it's what the box says! Purchased.

4. Countertop. Granite. Originally we wanted grey quartz for a number of reasons, but  for a number of better reasons (namely cost) we're going with a dark granite. :) Decided.

5. Floor tile. We want the colors of the permanent things in the room to  go with warm or cool colors, so we went with a cool grey tile with a hint of off-white marbling. Purchased.

6. Vanity. We wanted a solid wood vanity that didn't look like a basic builder vanity, but without the added cost of a designer one. This was very hard to find! Purchased.

7. New cabinet pulls for vanity. The vanity we found has white wooden pulls so we want to replace them with metal ones for a more updated, contemporary feel. Undecided.

8. Sink faucet. It needs to be a decent brand (they really do last longer!), brushed nickel, and widespread (not centerset)...which are quite expensive. :( Undecided. 

9. Light fixture. We wanted a light fixture with 4 lights to brighten up the space. There's no natural light in this room or opportunity for it. Purchased.


So there you have it. Hopefully that gives a good idea of where we're headed with this project. We're really excited with how all of the design elements are coming together, and can't wait to see the finished product!! Still have to decide on artwork, towels and other accessories. Ugh...so many decisions. 

Read more...

Guest Bathroom Budget

Thursday, February 23, 2012

So let's talk budget. Andrew and I are two very budget-conscious people, so before we started any work on our bathroom I put together a complete budget for the project. I included everything I could think of from the big purchases like a vanity, toilet & tub to the smallest details like $10 for cement board screws. I call this "attention to detail." You may prefer "anal retentive."

Can you tell which home improvement store we prefer?


Our total budget is $5,000 max, though we'd love for it to be less! This includes all purchases, bills for installation of anything we decide we don't want to do ourselves, repairs of anything we find that needs to be repaired, etc. This is quite scary for two reasons:

1. The average bathroom remodel in the U.S. costs around $15,000 (depending on source ranges from $9,000 to $25,000). Can we do it for so much less? I certainly hope so.
2. To us, even $5,000 feels like a lot of money to spend on a bathroom.

A good amount of this additional cost comes from labor. Since we're trying to do most of it ourselves, except possibly tiling, we're hoping to cut down on these costs a lot.

I did my research before creating this budget, but I know there are always things you don't even know need to be purchased or fixed, and I'm sure I've forgotten something. (I already know I severely underestimated in the plumbing department!!) We're tracking everything closely, and once we're done we'll reveal whether or not we stayed on budget or if the budget went down the drain!

Read more...

1 Guy + 1 Weak Girl + 1 Heavy Bathtub = Nightmare

Monday, February 20, 2012

As you may have guessed from the title, getting the bathtub installed was not an easy task. We wanted to install it in mortar because it makes the tub so much more sturdy, but as it turns out that is really hard!

First step was making sure the 60" tub actually fit in the 60" space. We couldn't just slide the tub in because the apron and the supports on the bottom of the tub kept catching on things, and we were afraid we might break something. So we had to lower it in, but this was really complicated as we had to lower it in at an angle around this copper pipe:


Unfortunately, we don't have pictures of the complicated maneuvering that was required to get the tub in the space (as we were pretty busy at the time), but in the process the tub attacked my finger.


Finally we got it lowered in enough that we could slide it the rest of the way. Andrew pulled and lifted from the access panel through our tiny hall closet while I pushed on the front.


So we got the tub in and, as expected, it fit perfectly. Now for the mortar. There was no way we were going to take the tub back out to put the mortar down and then put it in again, so we mixed the mortar and poured it out onto our piece of tarp (to protect the subfloor). Then we were going to figure out a way to lift the tub and slide it underneath.


The mortar was about an inch thick:


Our first thought was that we could tie rope through the overflow hole and lift up that side of the tub by tying the rope to the horizontal beam above. Then one of us would lift the other side of the tub while the other slid the tarp under the tub. But we couldn't get the rope tight enough to actually lift the tub. At all. :( At this point I started freaking out.

So Plan B: Shove wood under each side until the tub is a few inches off the ground and slide the tarp under. Problem? The tarp wouldn't slide. Too heavy. DUH! I started freaking out even more! Andrew had a good point, though, that even if it didn't work, what would it cost? $5 for another bag of mortar? But freaking out is in my nature, and I'm excellent at fretting.

But then Andrew had a stroke of genius! He cut a piece of cardboard from the tub's box into the same size as the tarp. He cut the rope in half, and taped one end of each piece to the cardboard.


Then we slid the cardboard under the tarp and strung the ropes under the tub and around the back. Notice the ropes in the bathtub:


Then came the moment of truth. We pulled and it all disappeared under the tub! Success!


Then we cut the ropes, pulled out the wood supports, and pushed the tub back down. I walked around in it to settle it, we made sure it was level, and there you have it. A brand-spankin' new tub. Installed all by our lonesomes. Just don't ask how long it took. Haha. :)


I really wish I had videoed our reactions when that actually worked. We were so excited! Words and pictures just don't capture the emotion of that glorious moment. We may have been successful this time, but I'm not sure I ever want to install a bathtub again. At least not in a bathroom that's this tiny!

Yay for progress! Now Andrew has to go into the crawl space to finish up the drain pipes, and then we'll start installing the cement board around the tub. 

Read more...

Happy Monthiversary!

Sunday, February 19, 2012

Well today officially marks 6 months since we've been in our house. Here's Andrew on August 19th at our closing. I remember that day like it was yesterday...or 6 months ago. :)


After 4 months of waiting for our offer to be accepted, we were so excited to be able to call it ours. Yesterday I did not feel that way because this weekend has been so frustrating! Our only renovation plan for the weekend was to get our tub installed. Sounds simple enough, right? But if we have learned anything in the 6 months that we've been here, it's that nothing is ever as simple as you think it'll be.

Yesterday we realized that the drain in our new tub is in a different spot than the current plumbing. Still, not such a big deal. Just move the plumbing. So Andrew measured. And the exact spot where the drain of our new tub comes out is right over a floor joist. This joist.


The drain would have come out right in the center of the joist, so reinforcing it with another beam so we could cut into it was not an option. Plus a notch in a joist severely weakens it, and we really didn't want to do that. Our only option then became bringing the back wall forward 2 inches so the tub lines up with the current plumbing. Dang. :(

We started by screwing four 8 foot 2x4s into the existing studs. Here is what it looked like before:


And now with all the 2x4s in:


Then since 2x4s are only actually 1.5 inches thick, we screwed 2 sheets of 1/2 inch plywood into the 2x4s, in essence creating a new wall.


Now we're ready to install the tub in mortar, and then we'll install the cement board right over the plywood and studs (on the sides).

The good news about all of this is that it did give us a peek into the soffit in the kitchen (look at the top of the picture with the 2x4s. That space is the soffit). When we redo the kitchen we want to get rid of the soffit so we can add extra cabinetry or at least just have the extra space at the top. We were worried there might be duct work or electrical running through it, but there's nothing! Yay!

Time to install this tub. Wish us luck! We've already figured out this is not going to be easy. Happy 6th Monthiversary, House!

Read more...

Do the Demo Yourself and Save

Saturday, February 18, 2012

A few nights ago we officially finished the demolition portion of our bathroom, so I wanted to share some of my tips for demoing safely. Even if you are going to hire a contractor for most of the work, you can save yourself a lot of money by doing the demo yourself. Here are 5 tips we followed to ensure a seamless (notice I didn't say effortless) demo.


1. Skip the sledge hammer.

Seriously, these things do far more harm than they do good. The key to good demolition is take down exactly as much as is necessary and NO MORE. We recommend a sturdy hammer and a flat bar as your tools of choice.

2. Take out anything you are reusing first.

May sound like an obvious point, but take a few moments to consider everything you will reuse. Have you removed the trim? Is there another use for scrap wood? We are reusing our vanity doors as access panels for behind the showers in our home. What can you reuse or resell?

3. Where will the trash go?

See what services your city offers and figure out before the demo how you'll get rid of the trash. Here in Springdale, AR the city will pick up construction waste or yard waste twice a year! How awesome is that? And if you stack it real nice they might take more than the 1 square yard they officially say they take! See if your town offers a similar service. If not, another affordable option is to use a truck or trailer to bring it to a dump. If you don't have access to these Lowe's and Home Depot offer a construction bag for around $100 including drop off and pick up. Just be sure to explore your options and make sure that the trash fits inside the limits of the dump service you're using.

4. Be Intentional with the process.

Now you're all ready to go to town right? If you have watched any DIY shows on TV your plan should be to do the opposite. Try to disassemble each piece one at a time. Think about how it was installed, and try to do the reverse. Not only is this the safest way, it is also the easiest and least messy way.

5. Use caution with water!

Plumbing was the greatest struggle in our renovation. Just turning off the water was not enough. If you are demoing near plumbing be sure to check if local shut offs are still working. Due to the pressure some of these may leak when closed, even though there are no leaks normally. Also empty any receptacles of water (like the toilet). Unless you want to use a turkey baster to get all the water out of the toilet like we did, take the toilet out before the shower so you can put the toilet directly in it to let it drain. Once the water main is shut off, run a faucet in your house to relieve pressure.

Use the overflow valve on the water heater to remove the last bit of pressure. This tip alone could have saved me 4 hours. Without doing this you may have water slowly leaking out of open pipes like we did.

Anyone can tear something up. Just be sure all your plans to put it back together are in place before your start so you don't have an demo-ed room for months on end!


Well, we're officially done with demo and most of the plumbing! Next on the list is getting the tub installed in mortar which we're working on today. But first, here's Arielle with white hair from sanding the ceiling. :)


So much dust...


Read more...

Don't burn the house down!

Thursday, February 9, 2012

So on Wednesday we bought a tub and today, thanks to a friend, we got it home. Chaucer is enjoying it already! Well, ok, maybe not enjoying it. He got in it on his own, but then decided he was stuck. :( 


One of the reasons we chose this tub is because it feels huge! That picture doesn't really capture how big/deep the tub is unless you know how big Chaucer is. ;) I had to test it out, too. It's pretty sweet! Now if only we could do something about those curtains...


The tub is made of this new patented material by Kohler called Vikrell. It's a plastic material, but much thicker and more durable than polycarbonate or fiberglass. It almost feels like metal. We were super excited to find it because our other options were cheap plastic or porcelain on steel that could chip or rust. We found it at Lowe's. Home Depot had nothing of the sort. Plus 1 for Lowe's. 

Andrew has been working on the bathtub plumbing all evening. In the process he sent me to Lowe's twice to get copper pipe things and I'm happy to report that I got the right thing both times! Also, I have to admit I was slightly worried that he might burn the house down.


Once the plumbing is done, we still need to finish sanding the ceiling (the dust is way easier to clean up in an empty room!). Then we'll install the tub, fix the drywall, install the cement board on the walls around the tub and then we'll be ready for tile! Woo!

Read more...

No turning back now...

Sunday, February 5, 2012

So on Friday night we decided to test one tile to see how hard it was to tear out. We tore up a tile and discovered that there was laminate underneath making it fairly easy to rip up. We practiced reverse gender roles and I worked on the demo while Andrew made dinner. :)

Here's a video of me ripping out tile (I'm not that handy so this feels like a big accomplishment for me!):


On Saturday we took out the vanity and the toilet. Typing it here makes it sound simple, but it most definitely was not. It involved calling the water company, getting into the crawl space (Andrew, not me), multiple trips to Lowe's, $50, and possibly some frustration. I won't go into the boring details, but we were trying to get the pipes to the sink not to leak when the valves were off so we could take the sink and vanity out. Also, toilets are disgusting. We didn't want the water to leak out when we pulled it up, so we bought a turkey baster at the dollar store and I literally spent about 20 minutes sucking water out of a toilet with a baster. Nasty.

The hardest part of it all though was the fiberglass shower insert. We spent several hours today on that alone. Andrew had to cut the drywall all around it because it was nailed into the studs. Then he pulled out all the nails, cut the pipes so it would slide out, and then pulled it out. It must have been installed before the walls around the bathroom were framed, because it was not going to fit through the door in one piece. Andrew broke it into smaller pieces, and we carried it out. Again, this sounds simple...but it wasn't. 

Here is the bathroom in it's current state. Chaucer wanted to explore. 


Finding #3: Nothing is as easy as you think should be. Unless you think it will be hard (like the tile), then it will be easy. :)

Finding #4: Fiberglass is itchy. 

Read more...

Big Changes

Saturday, February 4, 2012

So as stated in the previous post, it's been a busy few months for us. January was no exception, and we decided to delay our next project until our niece arrived! (We live very close to the hospital while my parents lives 3 hours away, so we wanted them to be able to stay with us.) My brother Ansen and his wife Dri had their first child, Avelea Wren, on January 25th. Isn't she beautiful?


So now that she's here, it's time to get started on a BIG project - remodeling the guest bathroom! No more excuses. ;) We're both a little nervous as this is our first real renovation, but we're also very excited! By remodeling I don't mean just a few cosmetic updates. We're going to gut and redo the whole thing. Here are a few before pictures:


We decided to do this renovation first after we found cracks in the bottom of the tub. We want people to be able to use this bathroom without causing water damage. That, and it was one of the worst rooms in the house and I felt bad making guests use it. Our goal is to be done with the demo by the end of the weekend, so we'll see if we make it! More progress updates to come soon.

Finding #1: Water is a pain.
Finding #2: The more you demo, the more it smells. At least with a bathroom. Yuck. :(


Read more...